Application Setup
- Install the Odoo Module.
- Double-click on the PrintDirect application to launch
the desktop application.
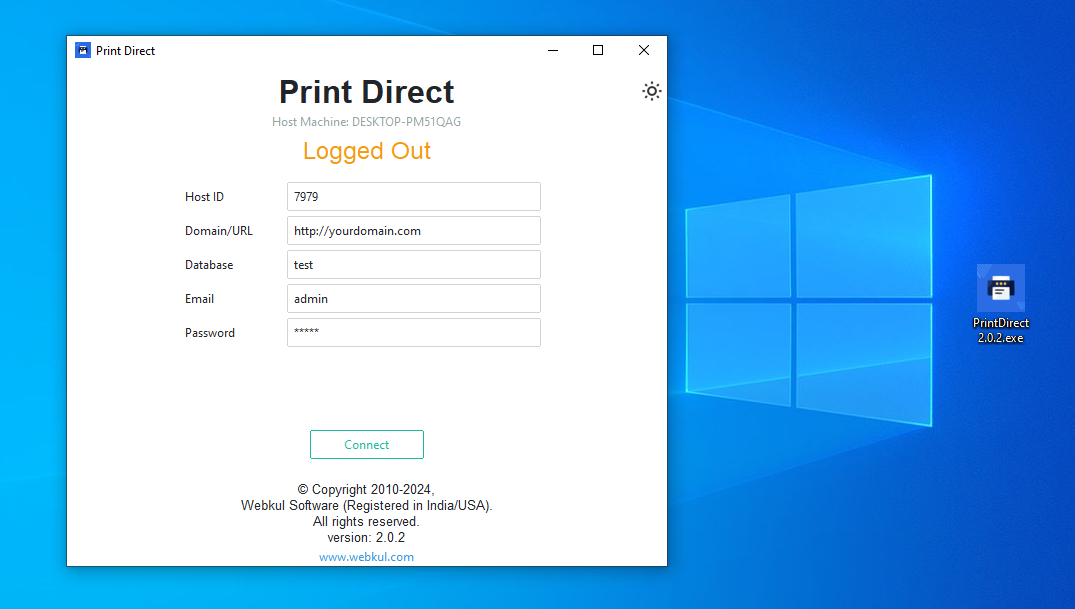
- Fill in your Odoo details:
- Host ID: A unique identifier for each machine you connect.
- Domain/URL: Provide the full domain including
protocol. Example:
http://yourdomain.comorhttps://yourdomain.com. If running locally, specify the port (e.g.,http://127.0.0.1:8069). - Database: Your Odoo database name. You can find this after enabling Developer Mode in Odoo.
- Email: The email address used for your Odoo login.
- Password: Your Odoo account password.
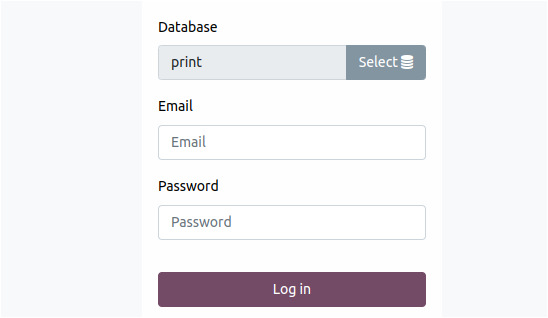
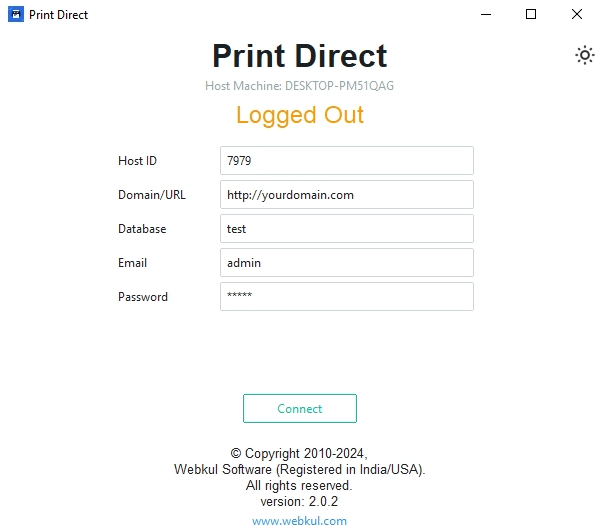
- Connect the application. Your device will be added to Odoo.
Module Setup
Odoo Integration & Configuration
- On Odoo, you can see
the list of connected devices under Print Direct > Host
Machine.
- The logged-in user under 'Grant Access to' is automatically granted access.
- To allow other users access to this machine, simply add them here-no need for separate logins.
- You can assign multiple users to a machine, and one user can access multiple machines.
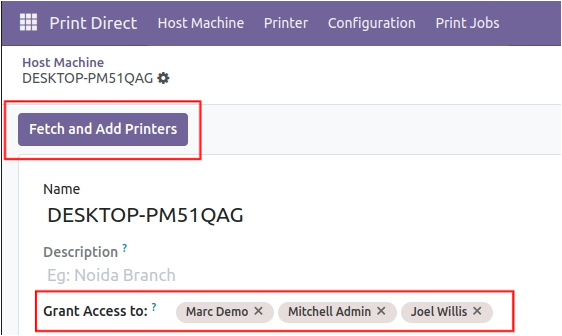
- Open the Host Machine, click on Fetch and Add
Printers. This will list all available printers.
If you install a new printer later, click Fetch Printers again to add it. - Set the appropriate printer type and activate it.
- ZPL - for Zebra printers
- PDF - for A4 printers like HP
- ESCPOS - for Thermal/Label printers
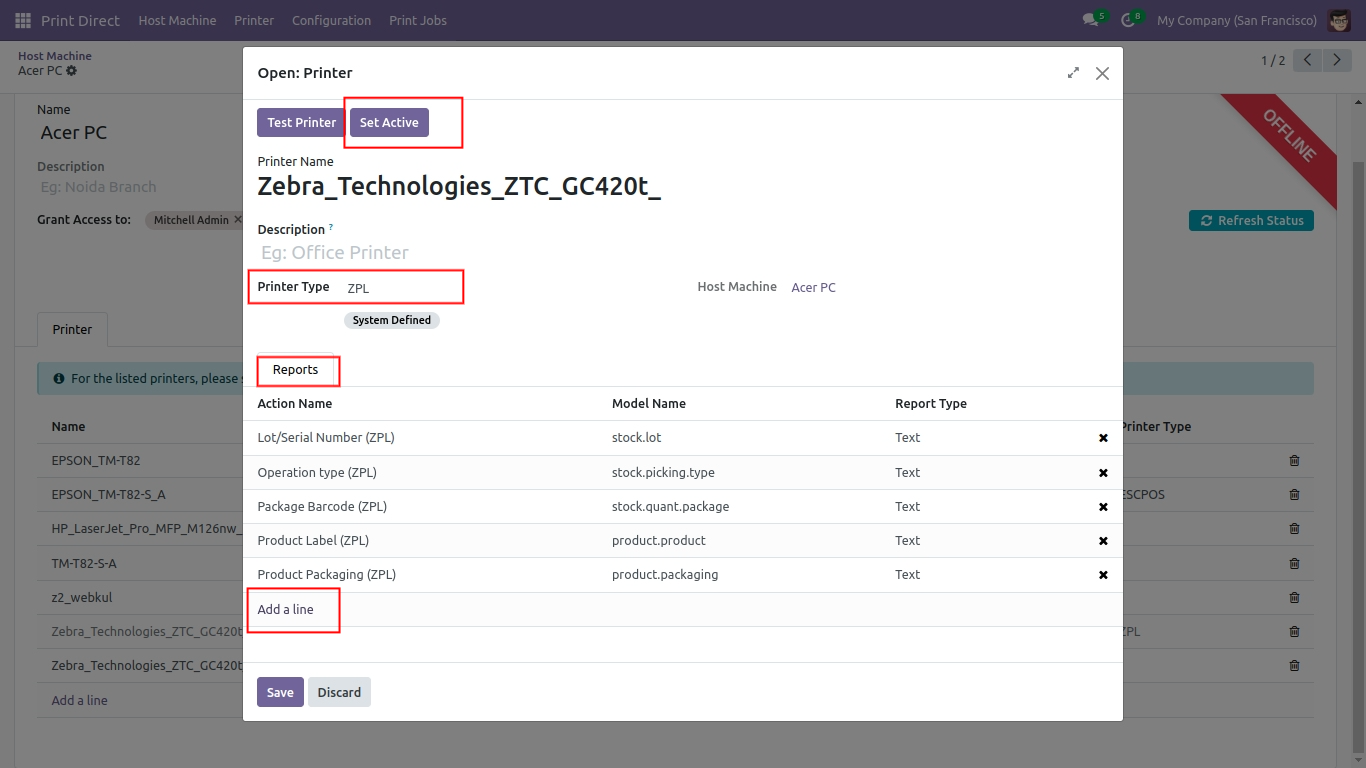
- Add the reports you
want to print on each printer.
Once configured, printing from the form view will automatically send the report to the printer.
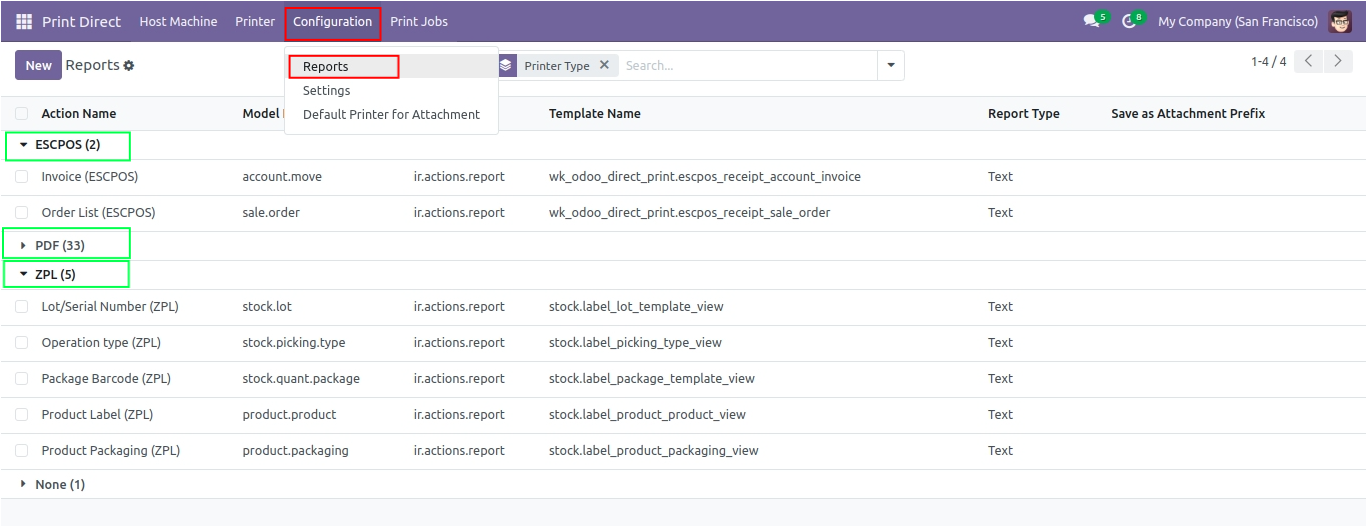
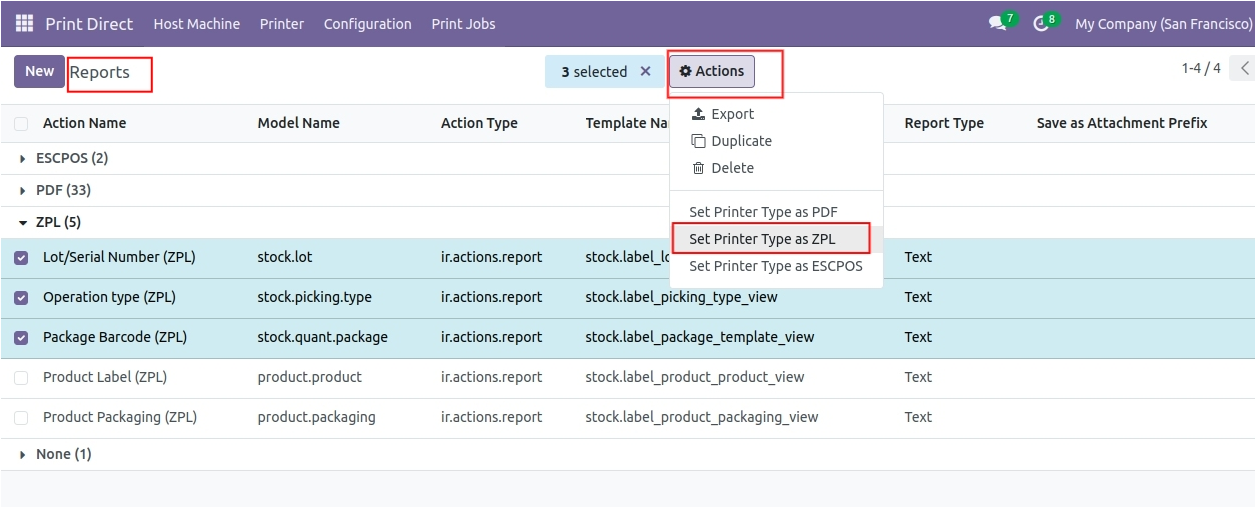
If a report isn't listed:- Go to Print Direct > Configuration > Reports .
- Open the report and assign a Printer Type (ZPL, PDF, or ESCPOS).
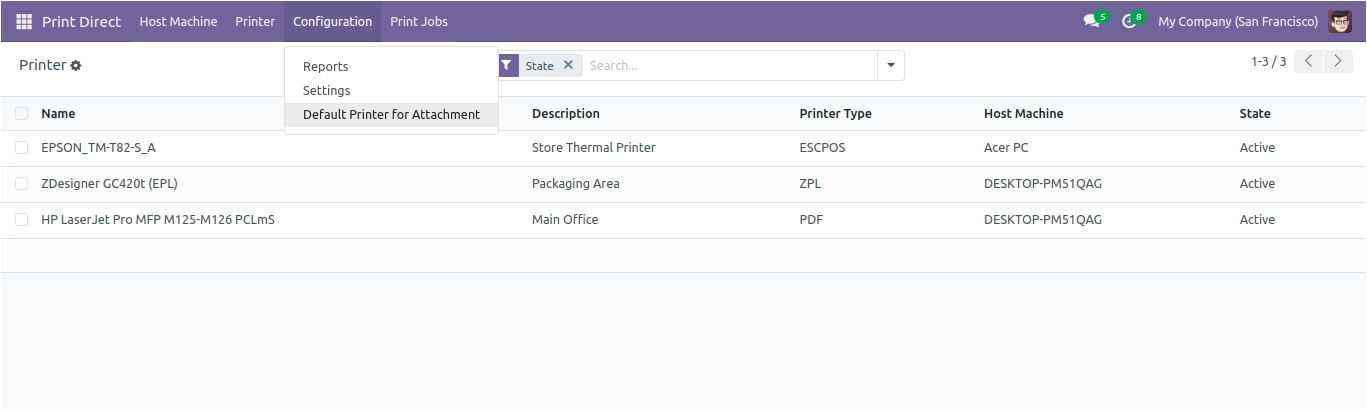
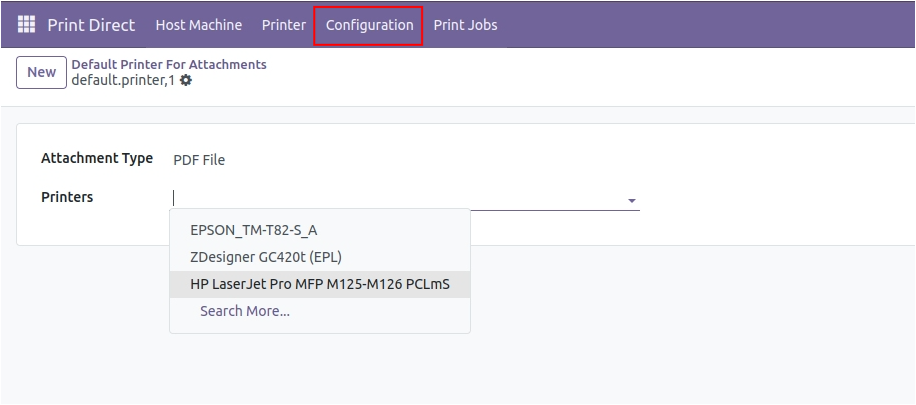
- Go to Print
Direct > Configuration >
Default Printer for Attachment.
Configure the printer based on the file type:- ZPL - for labels and Zebra printers
- PDF - for PDF document printing
-
Your module setup is now complete!
Go to Print Direct > Print Jobs to view and manage your printing activity.
Extra Settings
-
Automate Cleanup of Old Print Jobs:
To optimize performance and free up storage, you can automatically delete old print jobs.- Activate Developer Mode in Odoo.
- Navigate to Print Direct > Configuration > Cron > Clean Print Jobs.
- Enable it by checking Active.
- By default, it deletes print jobs older than 3 days .
-
Quick Tip: Save Your Session
You don’t need to log out every time you close the desktop app.- Simply close the application window.
- Next time you open the DirectPrint application, it will automatically reconnect to Odoo using your stored session.
Raw Printer
Raw printers are used to send commands directly to the printer in its native language, bypassing third-party drivers. They are extremely fast and commonly used for label or receipt printing (e.g., Zebra, ESCPOS, Eltron, Star, etc.).
Do I Need to Configure a Raw Printer?
In most modern operating systems (like Windows), Raw Printers such as Zebra (ZPL) or Epson (ESCPOS) are automatically detected and added. These printers are typically plug-and-play — you can plug them in and start printing.
If your printer does not appear automatically in the Control Panel, you will
need to add it manually.
How to Add/Configure a Raw Printer on Windows
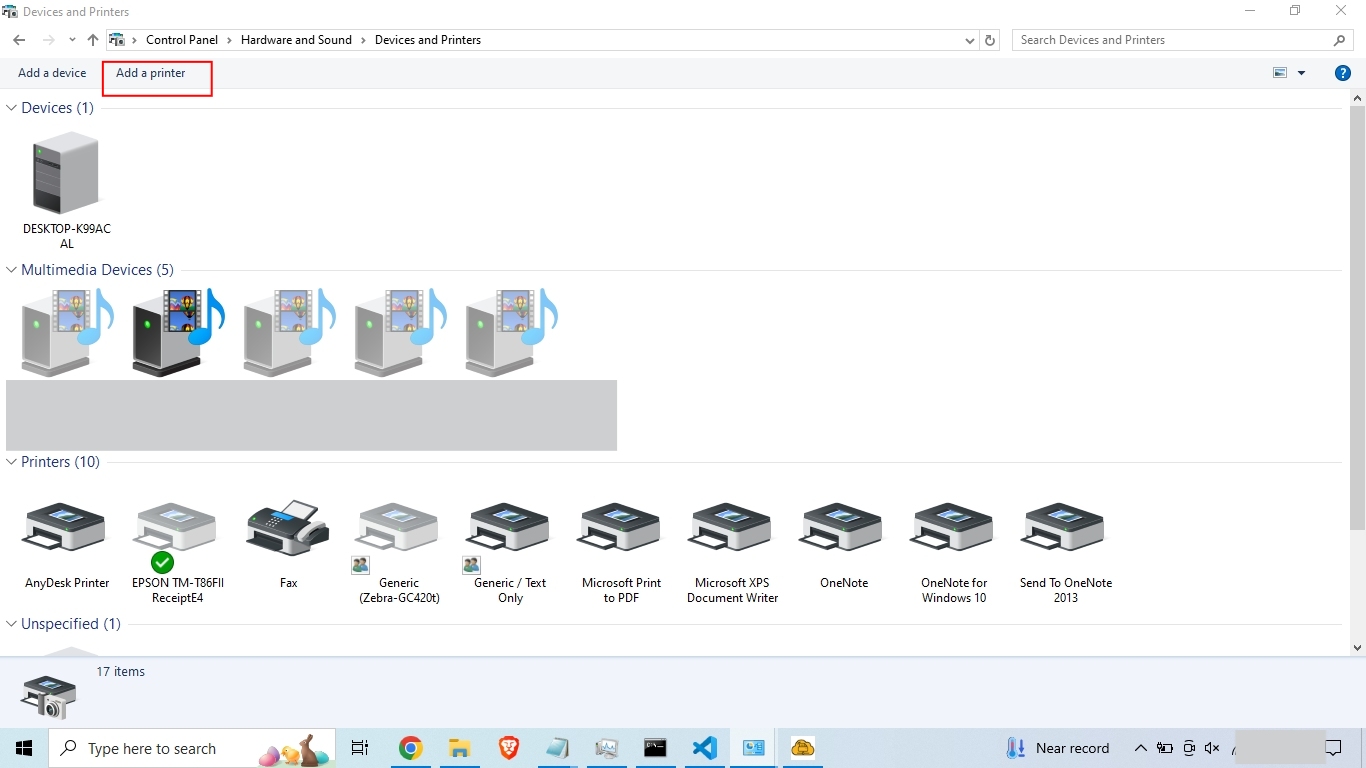
- Go to Control Panel > Devices and Printers >
Add Printer
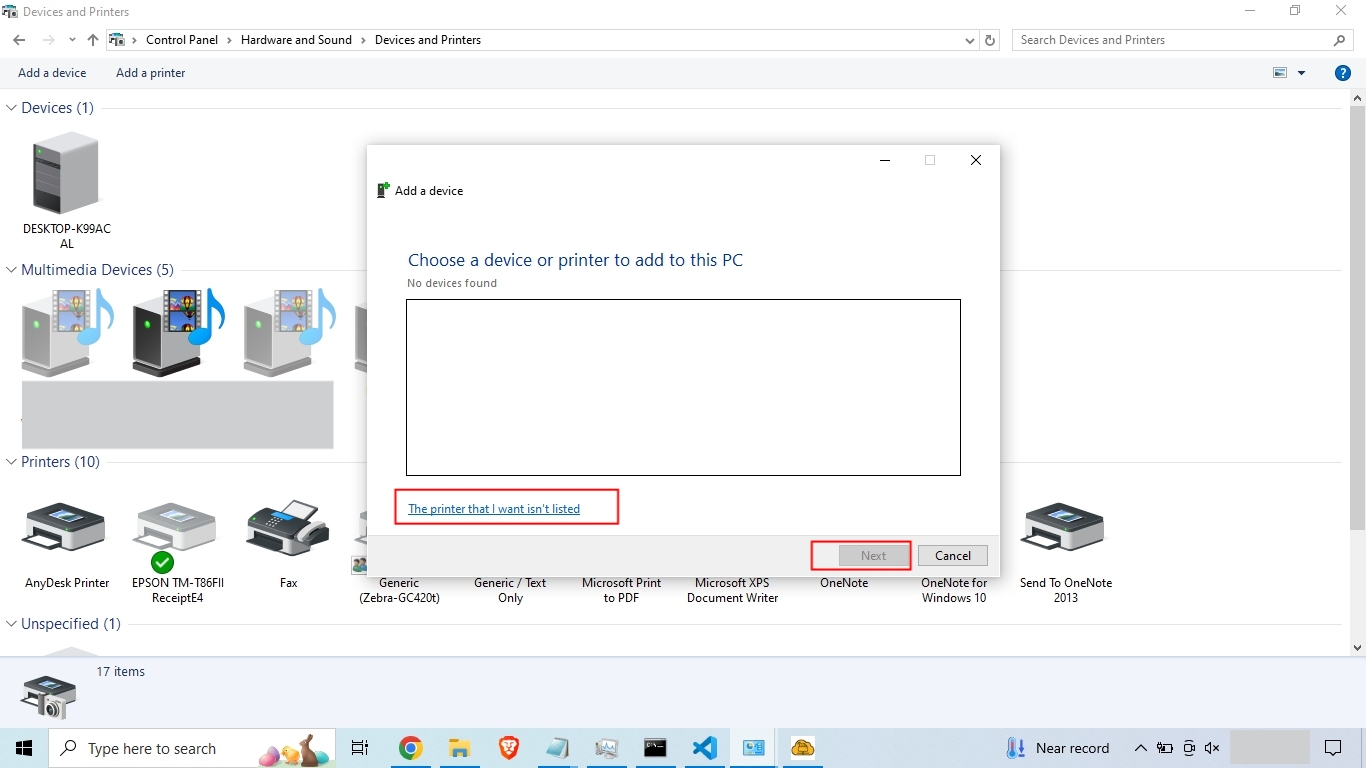
- If no printers are listed, click on "The printer
that I want isn't listed"
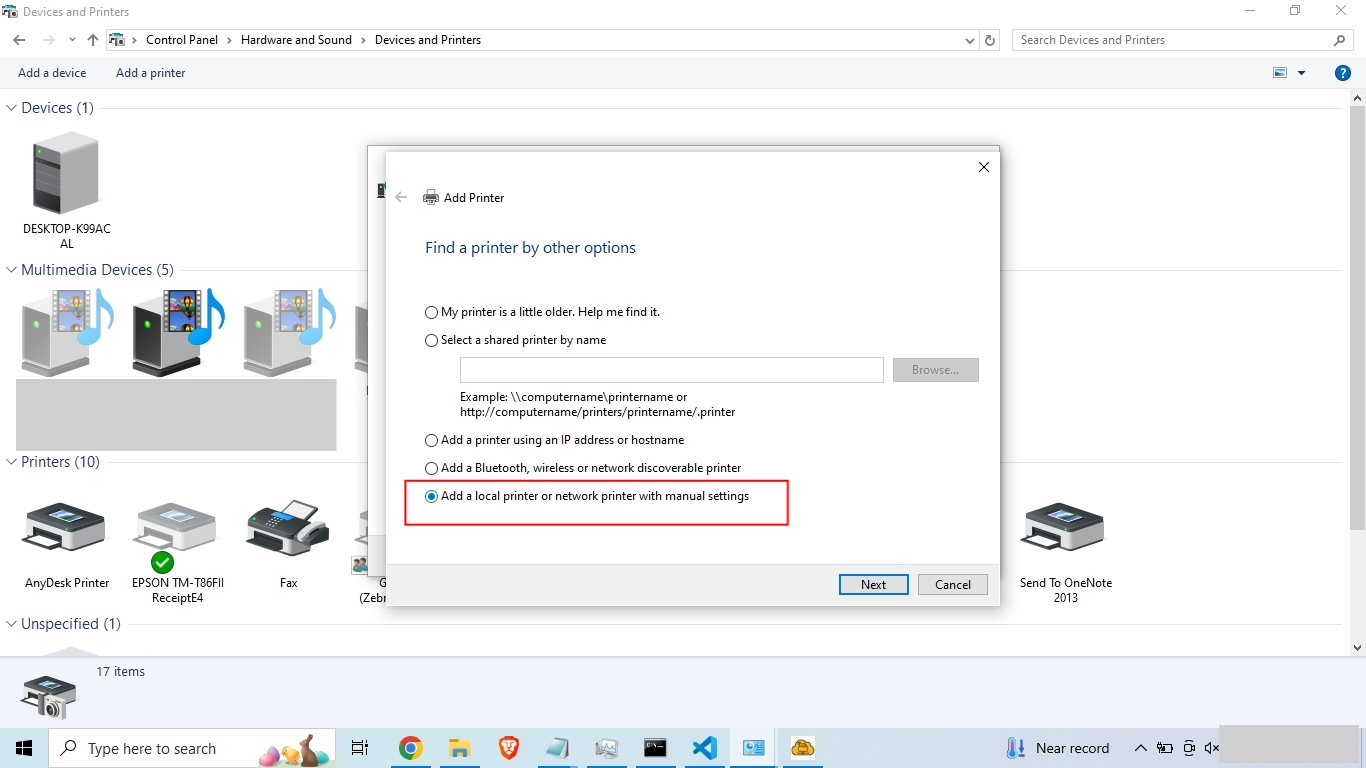
- Choose the option to Manually Add a Printer
- Select the printer you want to configure. The example
below shows a Zebra printer for ZPL printing.
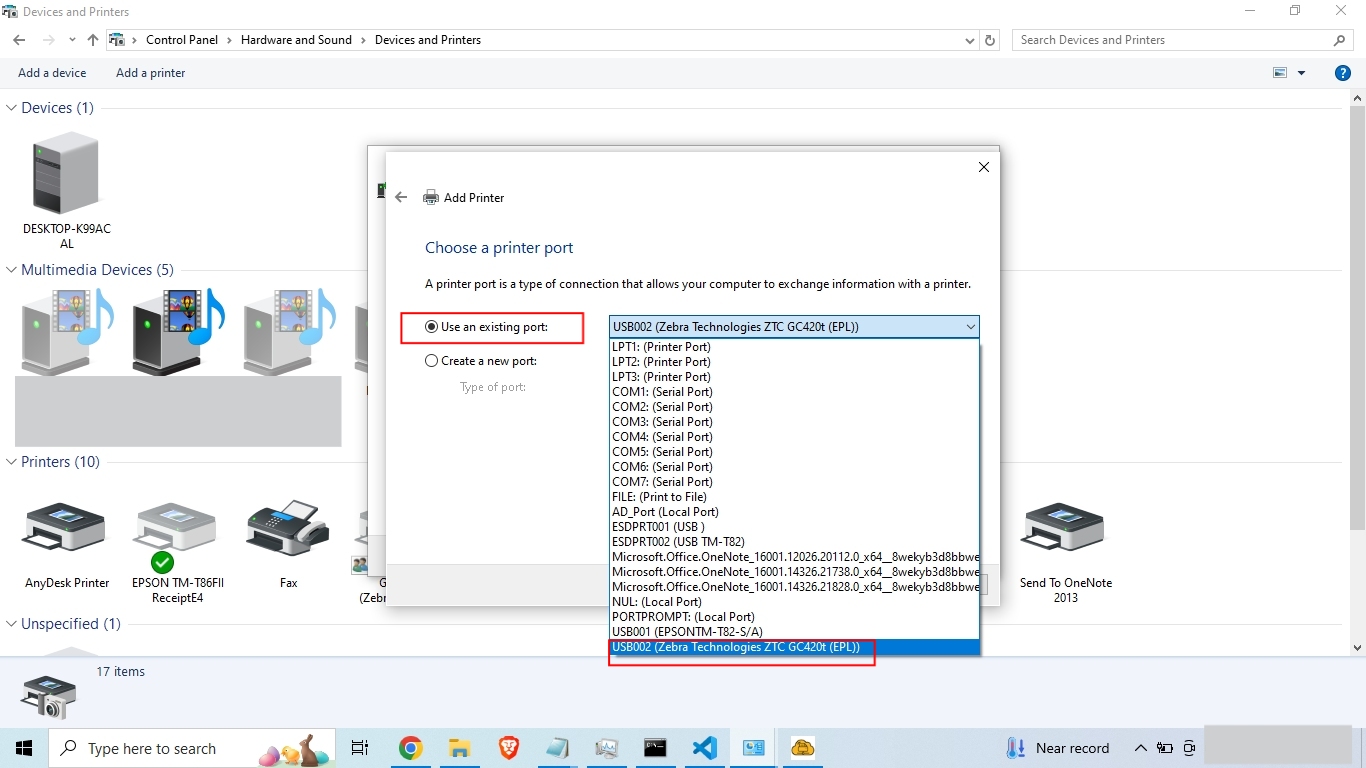
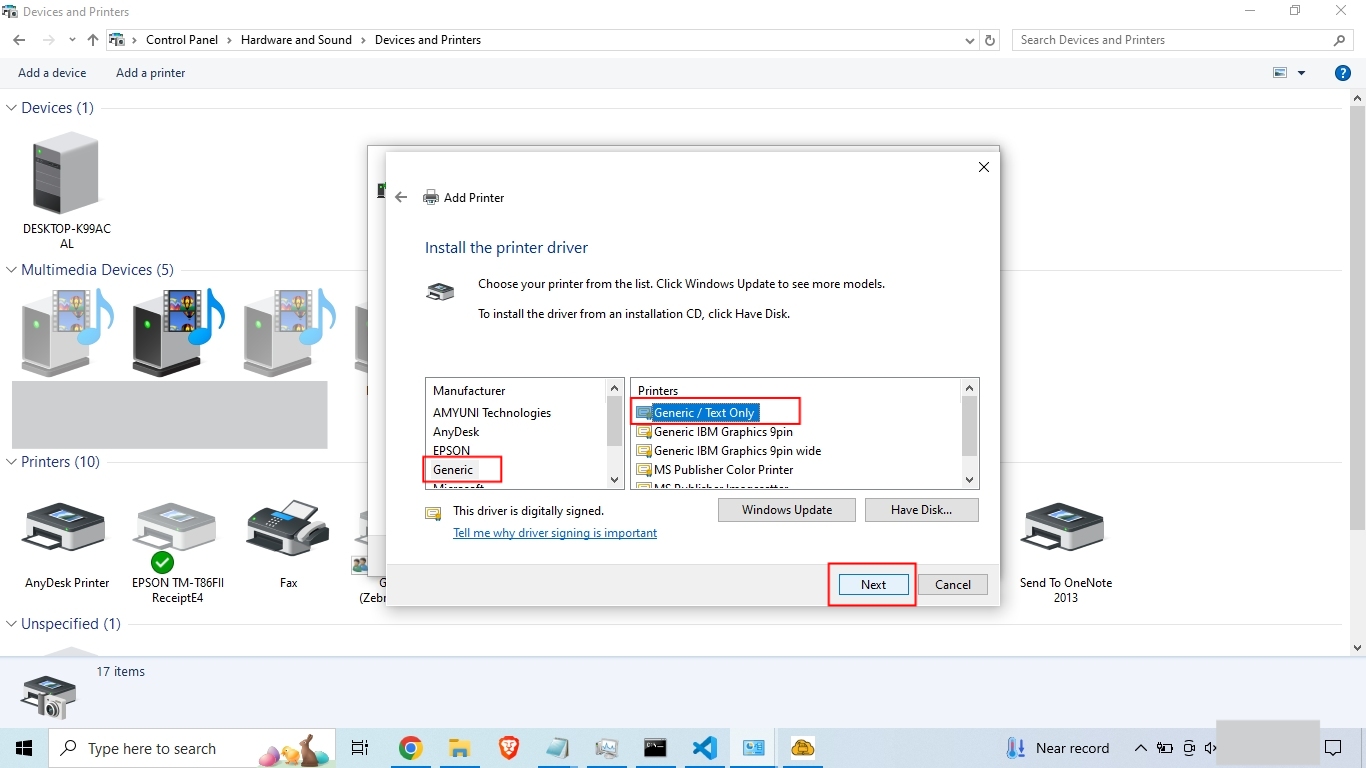
- Choose 'Generic' as the manufacturer and 'Generic
/ Text Only' as the printer type, then click Next.
- Enter a printer name of your choice for easy reference.
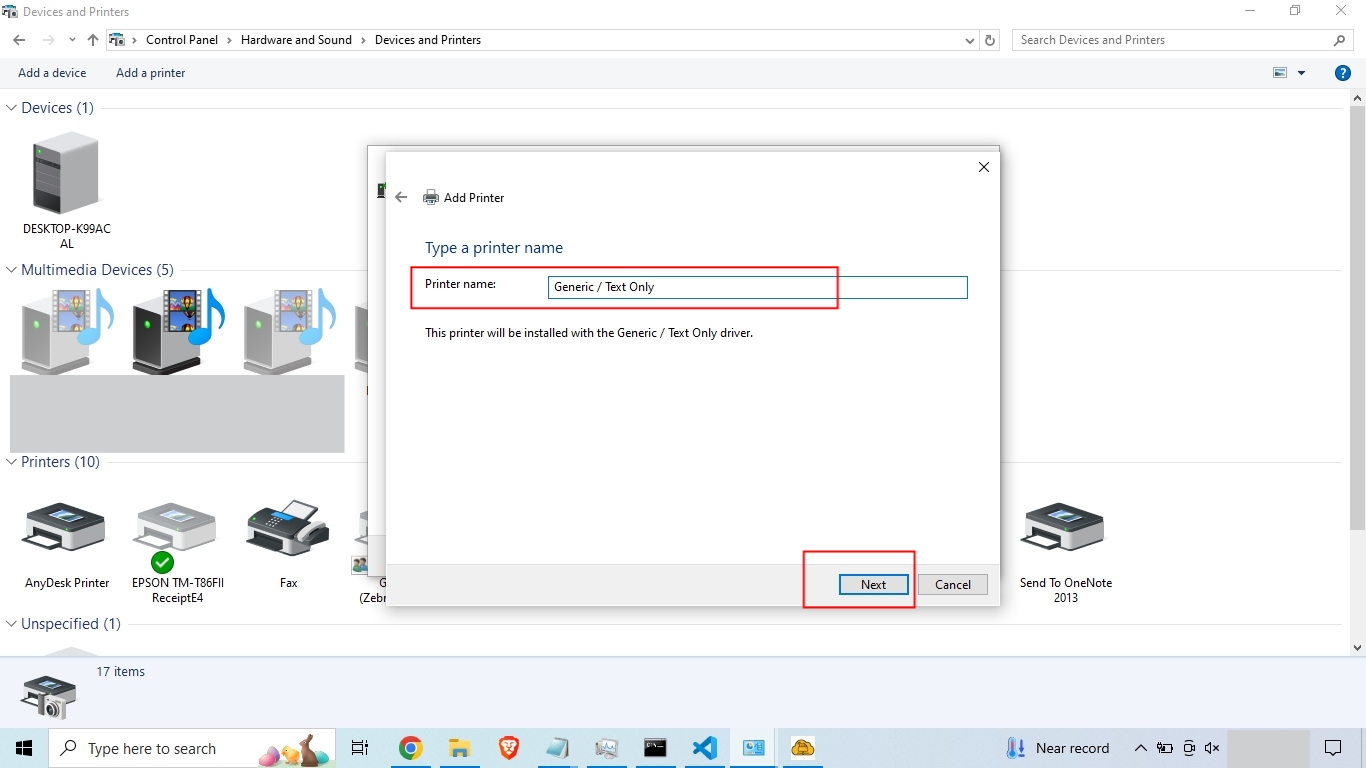
Your Raw Printer is now configured!
You can select this
printer for raw printing tasks in the application.
Install Ghostscript
For Windows Users Only:
If you encounter an error related to Ghostscript while using the PrintDirect application, you may need to install the open-source Ghostscript utility.
Step-by-Step Instructions:
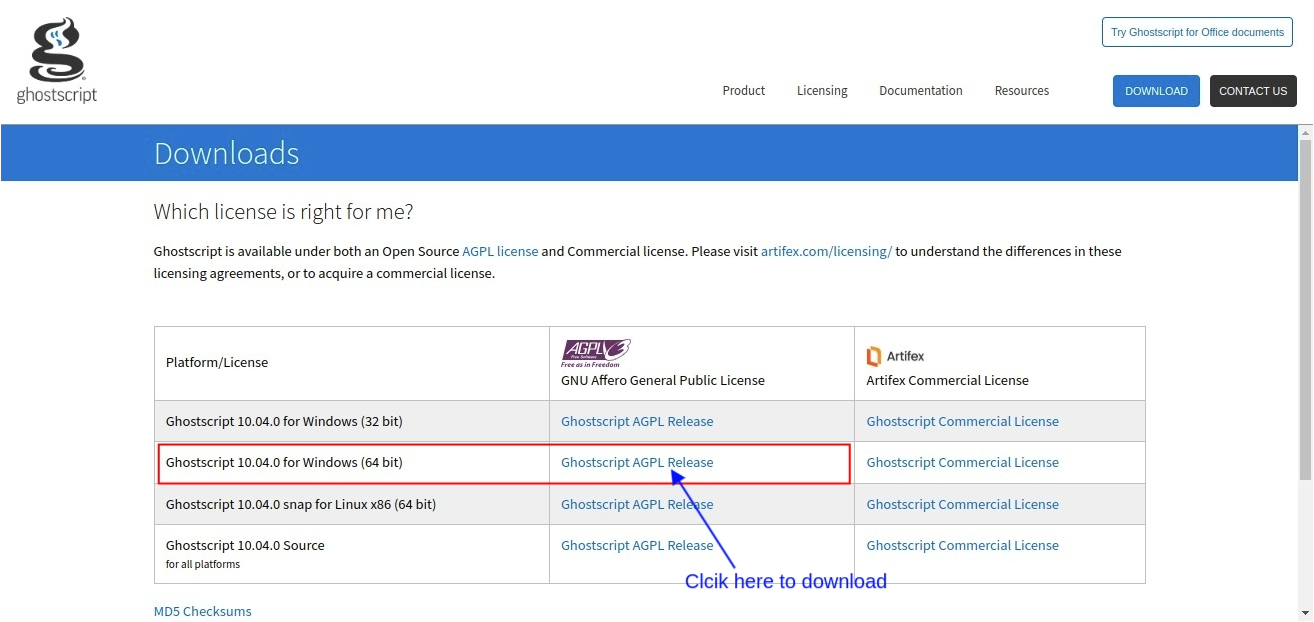
- Visit the official Ghostscript download page: Download Ghostscript AGPL Release
- Download the version for Windows 64-bit.
- Install Ghostscript on your system.
- Once installed, restart or run the PrintDirect Application again.
Frequently Asked Questions (FAQ)
1. Does it support multiple languages?
Answer: This depends on your printer settings. If your
RAW printer supports the language (e.g., ZPL with specific font sets),
it will print correctly — you may need to install the proper fonts.
For PDF printing, all languages are fully supported.
2. Is multiple printing supported?
Answer: Yes. You can connect any number of devices and send multiple print jobs. There are no limitations on the number of devices or jobs.
3. How fast can I print?
Answer: Printing speed depends on your network and file size.
- Local Network: Extremely fast and real-time.
- Remote/Internet: Speed will depend on your internet connection.
4. Cannot add printers?
Answer: If you're using an On-Premise Odoo server, make
sure your --gevent-port is properly set up. A misconfigured
port may prevent printer detection.
Solutions:
- Enable WebSockets: Start Odoo with the
--proxy-modeflag or addproxy_mode = Truein your config file. - Avoid port conflicts by setting a manual port:
--gevent-port=9000 - Read the Odoo deployment guide: Odoo On-Premise Deployment Documentation
- For Windows Users: Ensure the app has unrestricted access to network and ports (check Windows Firewall and permissions).
5. How do I delete cache and stored data?
Answer: Your app settings are stored locally. If you face issues with login or printer fetching:
- Close the PrintDirect Application.
- Go to the specified folder on your computer and delete it to remove all stored configuration and cache data.:
-
Windows:
C:/Users/< your_username >/AppData/Local/Print Direct For Odoo -
Linux:
/home/< your_username >/.local/share/print-direct-for-odoo - Restart the application.
6. Geting Ghostscript Error when trying to run the application.
Answer: If you encounter an error related to Ghostscript while using the PrintDirect application on Windows devices.
Follow these steps:
- You need to install the Ghostscript utility.
- Click here to view the installation process.